Flexor's 571 US GEAR install
(26 low res pics loading)
NOV 15 2004
Flexor delivered to me a nicely cleaned empty 3rd, new bearings, and a good quality set of 571 US GEARS. I chose for my starter pinion shim to use .100" then pressed on the new bearing then place the solid collar on and use .056" worth of shims.
With the yoke driven down hard with the electric impact, the pinion pre-load was a nice 10 in/lb. At 10 in/lb of resistance, I could not get my pinky to rotate the pinion just as a reference.
Not even my calibrated pinky can compete with this pendulum style torque wrench.
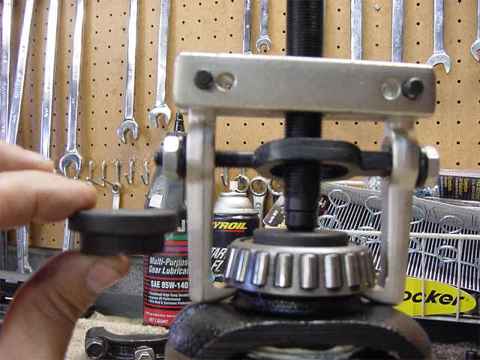
This puller, specifically designed to pull carrier bearings, is now one of my favorite tools. It gripped under the bearing cage nicely, was very stable, and did not slip off.

Probably a good idea to file the high spots off to minimize backlash variations.
I don't do the boiling oil/water trick for getting the ring gear to drop onto the case.....just support the teeth with some wood and align/tap it down til the bolts catch. Then use the bolts to pull it on the rest of the way.
The carrier bearings can be pressed on but this worked for me.
Almost ready to check the pattern....just load the case into the 3rd,get the backlash in the ballpark, and tighten the carrier bearings.
This is just something I whipped up for an easy interface for the big torque wrench.
First painted pattern....too deep.
Checking the cage for freeplay while I use the press....if the cage starts contacting the bearing splitter then I have to break out the 4" handgrinder and clearance the splitter cups.
Assembled everything and ran another pattern with .092" shim this time. Backlash is about 10 thou here so if I tighten it up some I can bring this good pattern in closer to the toe.
Coast side good
This is gonna be the final settings for this side of the pumpkin....so just tweat the backlash into the 7 thou area and tighten the carrier bearings.........
I have a handle that attaches to the bottom yoke and use a prybar to give the necessary resistance to get a readable pattern. Don't do this with loose carrier bearings as the painted pattern will be all wrong.
Yep. Reducing the BL brought the pattern to the toe side. Call it a competition pattern....Flexor is gonna need this as he has alot of competition with some of those waterfalls.
Tighten the carrier bearings to a real 70 ft/lbs in this case and keep the BL the same .007"
Now I can take the yoke off on the other side and do the end step seal install. This Makita 220 ft/lb electric impact cost about 180 but it has paid for itself twice over.
Don't forget the splashguard...
I use a little grease on the inside pinion contacting lip and UltraBlue RTV on the outside. I then carefully tap the seal in place with a hammer.
This National seal pn 1177 has a decent double lip....I think I'll pick up a few more of these. Ahhh ya....it's nice to have a digital camera that can get up close....Sony Mavica 85.
I cleaned the threads and used the blue Locktite liberally.
Ran the nut on with the electric and held the trigger til the 5 count. No dimple needed. Interesting notes about the pinion pre-load (PPL)..... Checked PPL with just the pinion in the equation.....10 in/lb PPL with the case in place and tight Carrier bearings....18 in/lb Last step- add the basic 2 lip pinion seal(lubed)....22 in/lb. Kinda interesting that the seal causes an increased drag of 4 in/lb. Results may vary with different seals. I wonder if anybody factors that in when using the crush sleeve technique?
Date coded :)
Why I don't do GENUINE.....
HOME